
Images comprise almost 75% of total page weight on most webpages, so it’s crucial to make sure they’re displaying correctly, and not slowing the page down – especially since a quarter of visitors would abandon a website that takes more than four seconds to load.
Visitors can’t convert if they abandon your site that quickly! And Google won’t be happy, either: the search engine has been listing load speed as a ranking factor since 2010, and its upcoming Page Experience update will continue to prioritize page speed as an essential ranking factor well into 2021.
Image Optimization for Web: Statistics
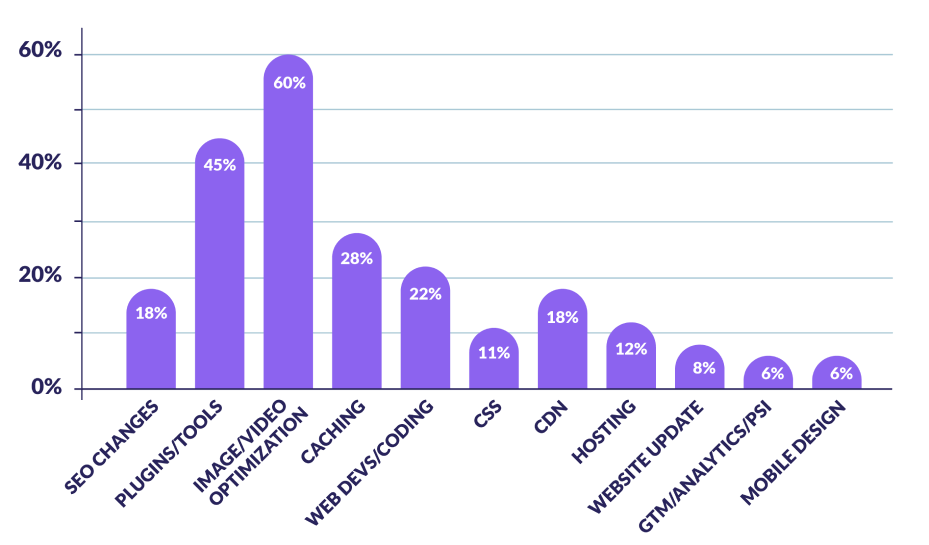
Optimizing your website’s images can have a positive impact in a number of areas. When we surveyed 65 digital marketing professionals ourselves, image and video optimization came out on top as the most recommended strategy to increase a website’s speed.
Most Important Website Optimization Strategies in 2021:
Want to use any of the graphics on this page? No problem! You can access our graphics on Google Drive. Just be sure to credit us by linking back to this article. Enjoy!
Image Optimization and Conversions
Properly optimized images will still have their visual quality intact – and if you’re running an eCommerce website, that’s really important for gaining customers’ trust. In fact, 92.6% of people say that visual input is the leading factor affecting their purchase decision.
When asked what they look for in online stores, 78% of Americans said “product images”. This made it the survey’s most-named feature, with product reviews and side-by-side product comparisons coming in second and third.
Product images are so important because they’re the only preview that online shoppers can get of a product before deciding to purchase. Indeed, the ability to touch a product before purchasing it is the number one reason why American consumers still shop at brick-and-mortar stores.
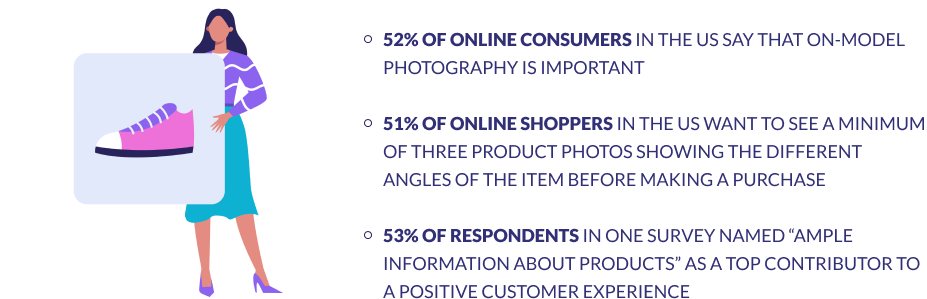
Product Photo Optimization: Fast Facts
Of course, product photos won’t be the only photos on your website, and it’s important to remember that even something as simple as a headshot on your “About Us” page can boost conversions.
67% of online shoppers have described high-quality images as “very important” to their purchase decision, and although it’s easy to assume that the professional quality of stock photos is all you need, customers don’t actually want to see generic content that they can’t relate to.
Take this case study from back in 2011, for example: When the research lab MarketingExperiments replaced a popular stock photo with a real photo of the test company’s founder, the page’s conversion rate increased by over 34%. Customers’ aversion to stock imagery has likely only increased since then!
Recap: To boost conversions, you should…
- Use detailed product photos
- Avoid stock images
Image Optimization and Website Speed
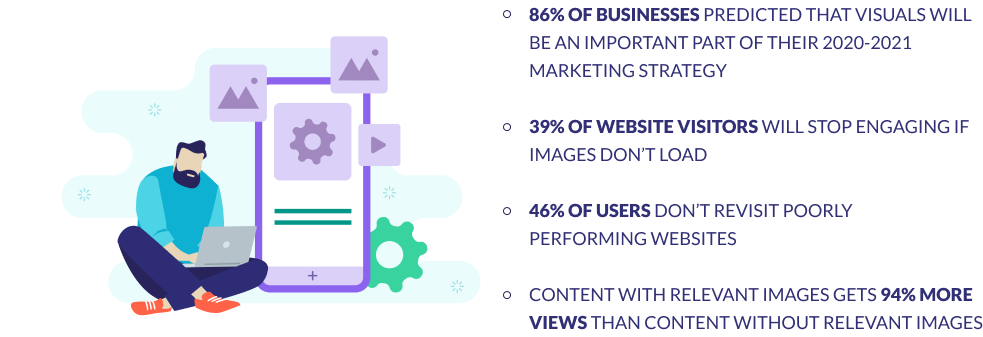
39% of users will stop engaging with content when the images won’t load or the loading time takes too long. A web page’s bounce rate also increases steadily with each additional second it takes to load. Clearly, website speed is crucial to success – and optimized images make it a lot faster and easier for a page to fully display.
This is because optimizing an image means reducing its file size, which means content can be downloaded by a user’s browser and rendered on screen more quickly. Fast loading times are key when it comes to providing a positive user experience – which should be at the top of any priority list, given that 88% of visitors are less likely to return to a website after a bad user experience.
When we spoke to web developer Matus Harman, he gave us another crucial tip for optimizing website load times: be selective about the number of images you actually include on a page.

Matus Harman
Full Stack Developer
“Images are often the largest asset transferred during a browsing session, which may cause slower page load. We should try to use them sparingly, and only when they are crucial to achieving website goals.”
What About Behind the Scenes?
At this point, we know that optimized images improve the user experience. But what about your experience, as the website owner?
Image optimization will make your life easier, too. Creating backups will be faster, and small file sizes will use up less bandwidth and require less storage space. If you’re hosting your own website, this means you won’t be in danger of running out of resources on your server. These decreased demands also mean that you’ll be able to grow your website more without upgrading from a cheap web hosting plan.
Testing Website Speed
After all of this talk about the importance of website speed, you might be wondering just how fast your own pages are at the moment. Even if you don’t have a live website yet, you’ll want to know how to keep tabs on your site speed for the future, so that you can fix any issues when they arise.
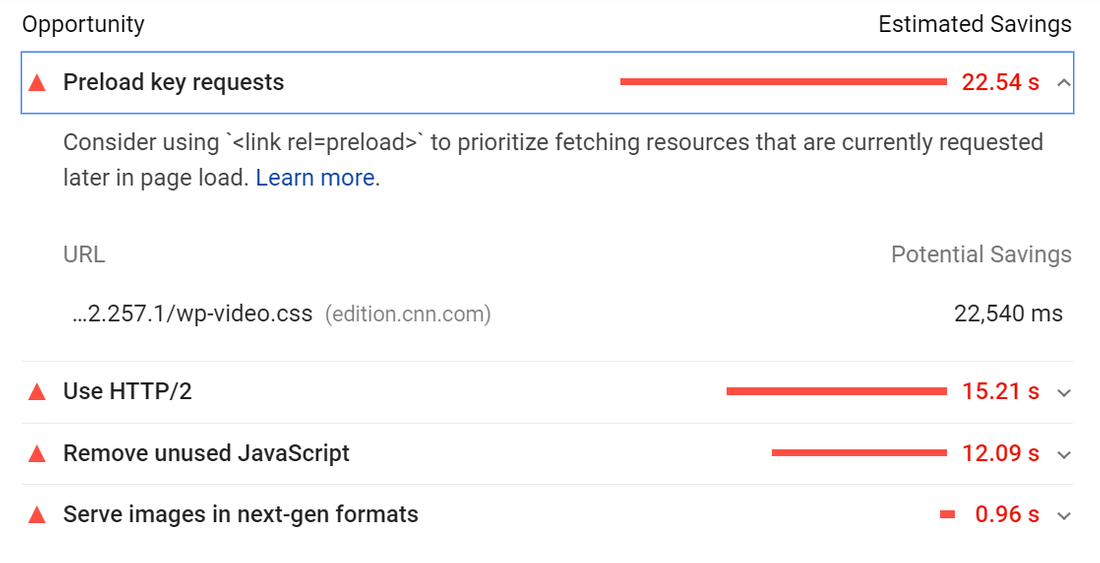
Several free and paid network monitoring tools can help you stay in the know by monitoring your enterprise systems, devices, traffic, and applications. We like Google’s PageSpeed Insights tool, because 1. It’s free, and 2. The info is coming from the top search engine itself!
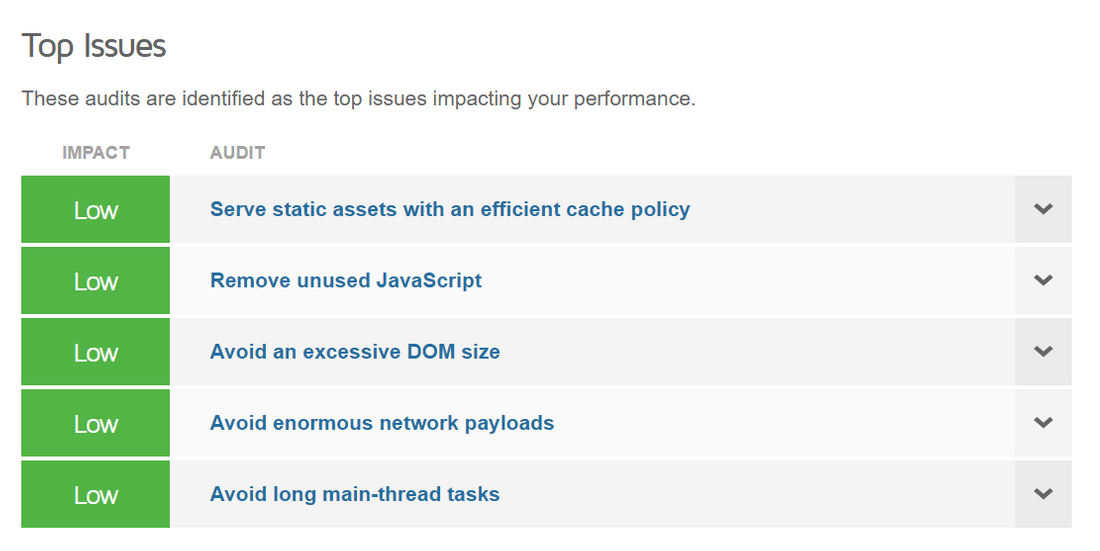
You’ll even get recommendations on how to improve the issues that Google identifies.
Another free option is GTmetrix. It works similarly to PageSpeed Insights: simply enter your URL to get an analysis and some suggestions.
Tools like these offer quick ways to gain insights into your website performance, and learn how to improve it. You could even use multiple tools and compare the results to figure out which issues are particularly evident on a page.
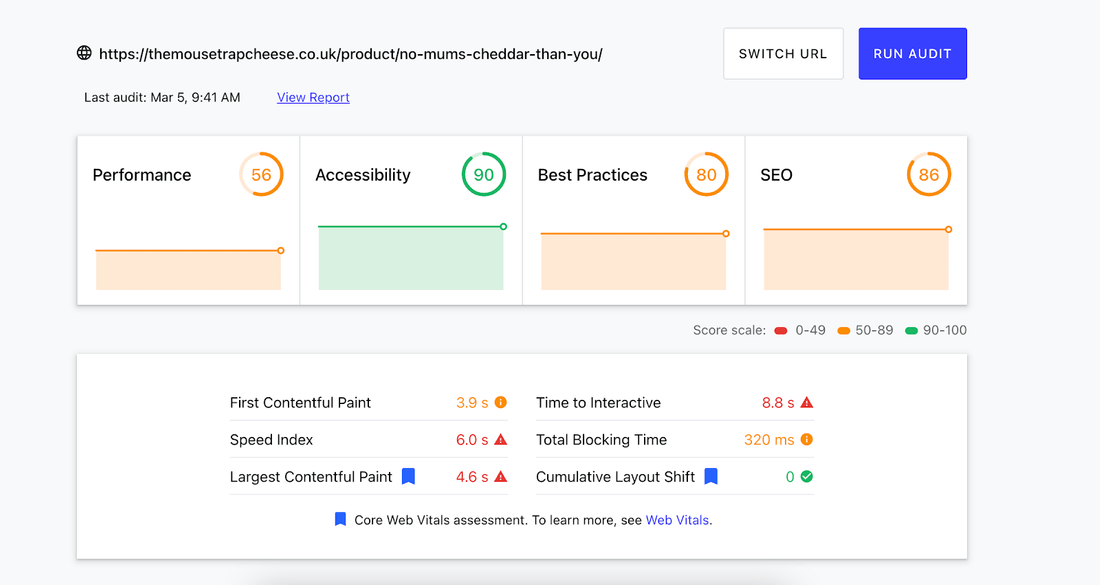
Site speed tools are also a great way to study the impact of image optimization on your pages. When we spoke to Matt Tomkin, founder of Tao Digital Marketing, he told us about some image optimization that the agency did for UK restaurant The Mouse Trap.
After resizing the website’s images, performance rating was boosted by four points. You can see the results below:
Recap: To boost speed and user experience, you should…
- Be selective with the number of images you upload
- Test your website’s speed to measure performance
How to Optimize Your Images for Site Speed
By now, it’s no secret that image optimization is vital to a website’s success – so let’s take a look at how you can actually do this.
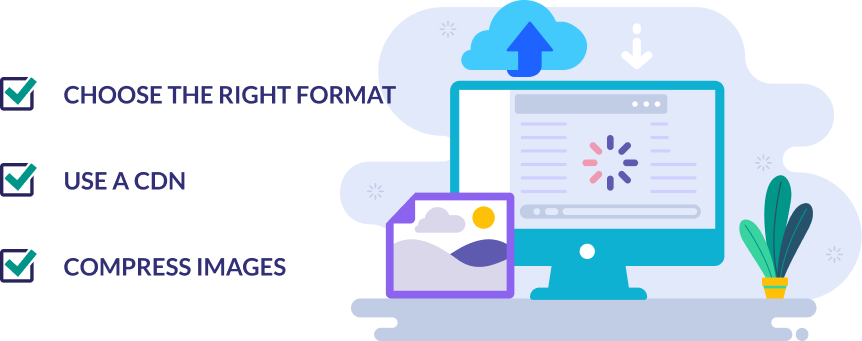
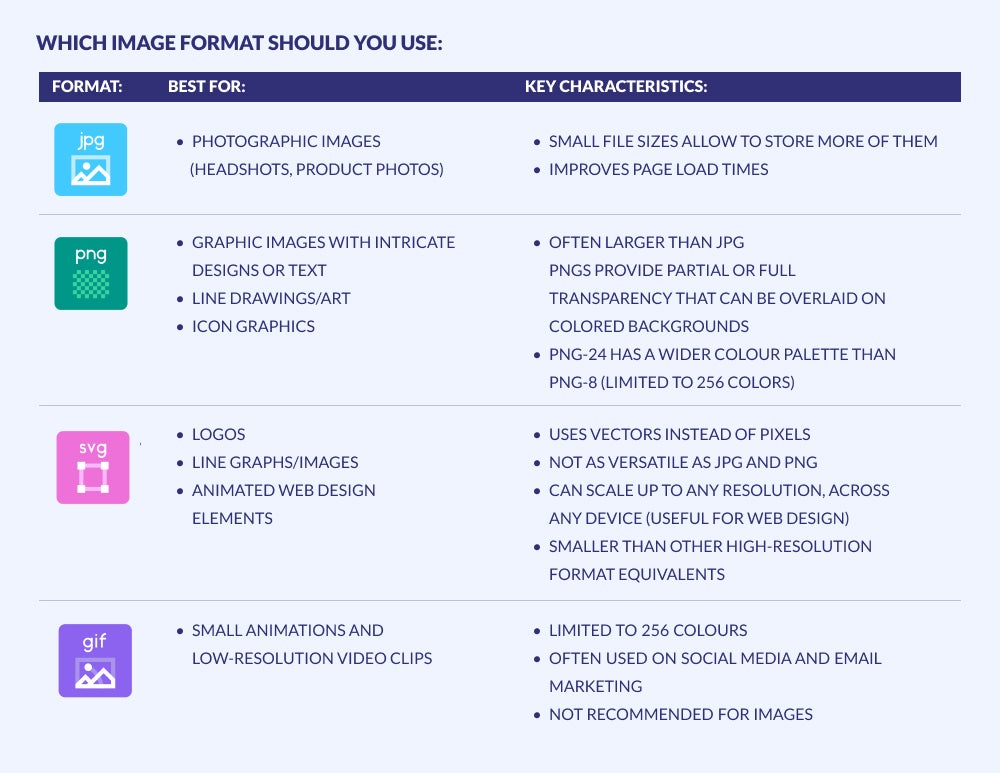
1. Choose the Right Format
There are a ton of different image file formats, but for our purposes, the most popular – and important – are:
- JPG: This format is best for photographic images, like headshots and product photos. JPG images have small file sizes, which allows you to store more of them at once and improves page load times.
- PNG: This format is higher quality than JPG images, so it’s usually used for graphic-type images with more intricate designs. PNGs can also provide transparent image backgrounds that can be overlaid on colored backgrounds. The tradeoff is that PNG images are larger than JPG images, so using them will have a worse impact on load time.
- SVG: This format is often used for vector art or solid colored graphics, like logos or line art. SVG images are responsive across devices, which means icons and graphs will display correctly no matter how they’re viewed.
Which File Type Should You Use?
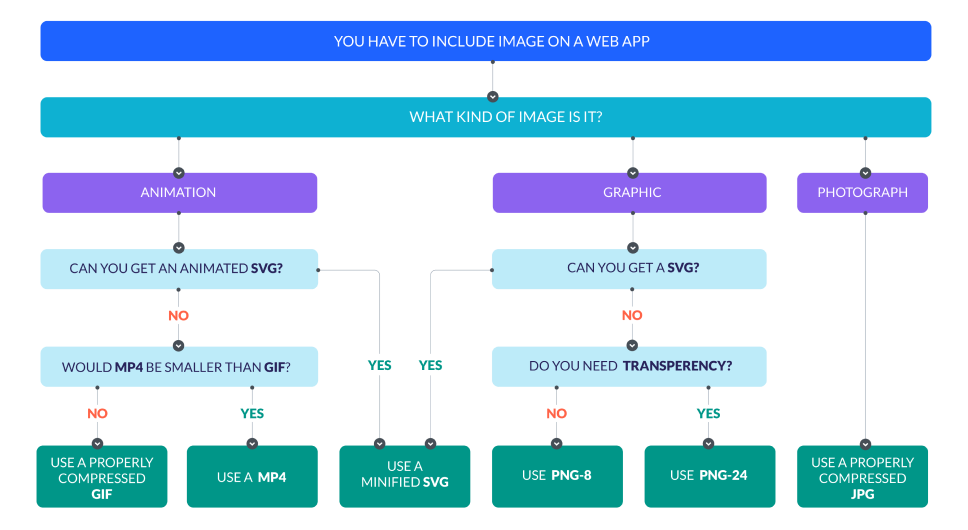
What Do the Different File Types Mean?
2. Use a CDN
A content delivery network, or CDN, is a geographically diverse network of servers that helps speed up page load time by reducing the distance between the website visitor and the server.
Cloudflare is one example of a CDN that balances traffic across multiple destinations by using 155+ global data centers (where servers are housed). You can use its most basic services for free.
3. Compress Images
Wait – what is image compression? Image compression is the process of encoding an image’s data using fewer bits than the original image. It means minimizing the size, in bytes, of a file without diminishing the quality.
Image compression can be lossless or lossy.
- Lossless compression compresses pixel data so that the picture quality stays the same as the file size shrinks.
- Lossy compression actually eliminates some pixel data in order to shrink the file size, which works because our eyes can still process an image correctly without every single piece of pixel information.
Tools for Image Compression
Image compression might sound complicated, but there are actually countless free and paid tools online that will do it for you in just a few clicks. In fact, there are so many options that it can be overwhelming to pick an image compression tool – so we’ve highlighted a few of our top picks here:
1. ImageResizer – Free

ImageResizer lets you upload images from your computer, and then resize their width and height dimensions and also compress them in just two clicks. We recommend choosing the “Bulk Resize” option from the homepage, even if you’re only optimizing one image, because that setting will automatically compress the image(s) when you resize them. You can then save the new image as a JPG or PNG.ImageResizer is best for: Personal or small website owners who need to optimize a few images.
2. TinyPNG – Free basic service, or $25/year Pro plan

Don’t be fooled by its name – TinyPNG actually compresses both PNG and JPG files using smart lossy compression techniques. You can upload up to 20 images at once, each with a maximum file size of 5 MB, all for free. If you need additional tools, TinyPNG’s $25/year Pro subscription increases the file size limit to 75 MB.TinyPNG is best for: Artists, designers, big brands, and other website owners who need high quality (and typically PNG) images.
3. Kraken.io – $5 – $79 per month

Kraken.io is an image compressing and resizing service that comes with a minimum of 500 MB worth of images each month on its most basic plan. Pro users can also use the Web Interface tool to enter a webpage URL, and have all of the images on that page optimized and downloaded into a ZIP archive. Kraken.io supports JPG, PNG, SVG, GIF, and Animated GIF formats.Kraken.io is best for: Users running a larger website with a lot of images that demands more bandwidth and storage space.
What About WordPress Plugins?
So far, we’ve talked about image optimization tools that you can use externally, before uploading the images to your site. But if you’re using WordPress, you also have the option of downloading image optimization plugins to do this work automatically – in other words, you can skip the middleman.
We spoke to a lot of website owners about their image optimization strategies, and have narrowed down a few of the best-recommended WordPress plugins – but before we give you the details of each, it’s worth noting that WordPress plugins are often created by third party developers, and it’s always a good idea to read past user reviews before downloading a plugin to ensure that it works with the most updated version of WordPress and doesn’t contain any malicious code.
1. Imagify – $0 – $9.99 per month
Imagify does the same work as the services we’ve already discussed – reducing image file size without diminishing quality – but the difference is that it can be done in one click from your WordPress dashboard.
This plugin also lets you resize images quickly, so you won’t have to go through the hassle of resizing and then reuploading. You can also restore pictures to their original versions if you need to.
“Since most of my clients are using WordPress, I use a paid service plugin called Imagify to further compress uploaded images automatically. The great thing about this plugin is that you can see 70%+ reduction in image size, which means a faster-loading website – and a wink from Google when it comes to SEO.”
– Antonio Wells, CEO of digital marketing agency NAMYNOT Inc.
2. ShortPixel – $0 – $1,000 per month
As you might have guessed from the price range, ShortPixel is a plugin with a sliding scale of resources to meet the needs of everyone from personal bloggers to large companies. You can install it directly into your WordPress dashboard, and will see the benefits in terms of quicker backups, preserved image quality, and less bandwidth taken up. This tool supports JPG, PNG, GIF, and PDF images.
“I use ShortPixel, a simple plugin that goes through all of the images in your WordPress Media Directory to compress them even further without compromising the quality that visitors will see.
For me, it reduced about 30 KB per image on average. This took three to four hours to fully roll out, since the plugin compresses image by image and I have almost 1,000 images on the site.”
– Carissa Harmer, hobby website owner at Detecting School
3. Smush – Free
Smush is an image compression and resizing plugin that also lets you lazy load images to keep unnecessary bandwidth from getting used up. Lazy loading postpones the loading of images below the fold, so that images only load when users actually scroll to that part of the page in their browser (rather than loading all at once when a user lands on the page).
“What’s worked great for me is the free version of Smush. It’s literally just one download and activation, and then any media files you upload to your back end are instantaneously resized and compressed to save space and improve loading speed.
I’d hate to think how much time I would have wasted continuing the whole process manually if I hadn’t learned that trick.”
– Will Peach, personal website owner at WillPeachMD.comTop Tip: Don’t get carried away with plugins. The idea of automating some of your image optimization work is tempting – and by all means, you should use a few WordPress plugins that make your life easier! Just don’t go overboard installing a bunch of them, because too many plugins can actually slow down your site – which is the opposite of what we’re going for! It’s best to be selective and just choose a few of your favorite tools.Go to the top
SEO Image Optimization
SEO stands for search engine optimization, and it refers to all of the little tweaks you can make to a webpage to make it more readable to search engine crawlers – and therefore more likely to rank highly on search engine results pages (SERPs).
SEO image optimization is different from the broader image optimization that we’ve discussed above, so we’ve given it its own how-to section below.
SEO is so crucial to a website’s success because nearly 70% of all online experiences begin with a search engine, and over 90% of global traffic comes from Google Search, Google Images, and Google Maps.
The higher up you can get your pages ranking in Google results, the more clicks they’ll get. So, how can you utilize SEO image optimization for better performance?

Search engines like to see that a page provides a quality user experience. Short website load time, which decreases bounce rate and increases time-on-page, is even a confirmed ranking signal by Google.
But aside from speeding up load times, image optimization for SEO also involves contextualizing images so that visitors and search engines can understand them more easily.
There are a number of ways to make your images more accessible to search engines, which we’ll explain below.
1. Optimize image file names
It can be second nature to save images with whatever default file names they come with – but that random string of letters and numbers can hurt you in the long run.
Before you upload an image onto your site, it’s important to make sure the file name is relevant. For example, the file containing this image…

…should be named something like “chocolate-frosted-cupcake”, and not something like “WW8jBak7bo”.
This is because search engines don’t just crawl the text on your pages – they also crawl image file names and other attributes.
2. Optimize image titles
Similar to file names, image titles are another of those attributes we’re talking about. You’ll have the option to add an image title after you’ve uploaded it, and it can be similar to, or even the same as the file name – just keep it short and relevant to what the image actually depicts!
3. Include alt text
Alt text (or alternative text) is text that appears in the place of an image if the image fails to load. Alt text is really important for SEO because it helps crawlers understand the image file and the content covered on a page, in order to provide more accurate search results.

If you’re using WordPress (or a number of popular website builders), you’ll be able to input an image’s title and alt text once you’ve uploaded it. You can also include image captions, which in most cases are also important for SEO – just be sure to use your best judgement, and only caption an image if the information is useful for visitors.Top Tip: don’t forget the first purpose of alt text, which is to work with screen readers so that blind and visually impaired users can tell what an image is depicting. This original use makes alt text the most important optimization tool for improving the user experience!
4. Make use of sitemaps

An XML sitemap is basically a list of all of the URLs on your website. It works like a roadmap for Google to identify which pages are available for crawling. If you’re using WordPress 5.5 or above, there is a basic XML sitemap feature that lets you automatically create a sitemap without having to use a plugin.
To find it, just add “wp-sitemap.xml” to the end of your domain name and hit enter.
If you do decide to use a WordPress SEO plugin, then you’ll be able to go beyond the basic features and have more control over the content that’s included or excluded from your sitemap. This includes adding images to your sitemap, which helps Google index your images and better recognize the content on each page.
5. Use responsive images
Responsive images are images that display correctly on devices with varying screen sizes (e.g. desktops, smartphones, and tablets), and they’re important for SEO because they lead to better user experience. We all know that positive user experience is important to search engine crawlers, and Google itself has even named responsive images as an important best practice technique.
If you’re using WordPress, different width dimensions of the images you upload will automatically be created, so you can already tick “responsive images” off your to-do list!Top Tip: Use vector images, not raster images. Vector images are both resolution and scale independent, which means they’ll display well across devices. They’re defined by points on a plane, rather than by square pixels, which makes them a more adaptable option.
Raster images, on the other hand, depict an image by encoding the values of each pixel within a rectangular grid. Basically, they’re a lot less flexible than vector images.
These are all tweaks you can make to the image itself – but remember that it’s also useful to provide context around an image, too. For example, if you’re creating a webpage to share your Mom’s famous brownie recipe, and you include a picture of the finished product, you’ll want the text either before or after the photo to explain what the photo is showing.
Image Optimization: Recap
Image optimization is a huge part of building a professional website. It can lead to substantial improvements in conversion rates, site speed, and SEO. And the best part is, image optimization is something you can accomplish on your own without taking up too much time.
In summary, you should aim to:
- Choose the right format – Find out if you need JPG, PNG, and/or SVG image files.
- Use a CDN – Reduce load times with a content delivery network.
- Compress images – Balance the smallest file size with the best image quality.
- Optimize file names and titles – Make sure they’re relevant, not random.
- Include alt text – Describe each image to improve the user experience.
- Make use of sitemaps – Make it easy for Google to index your images.
- Use responsive images – Make sure your images display well on different devices.
And don’t forget about the many tools – both free and paid – that are available to help you with everything you need to do, from compressing images to testing page speed!
This amazing guide was originally published on WebsiteBuilderExpert.